NestJS là một framework Node.js mạnh mẽ được xây dựng trên nền tảng TypeScript, nhằm mục tiêu giúp phát triển ứng dụng server-side hiệu quả và dễ bảo trì. NestJS được thiết kế để mang lại sự hiệu quả và linh hoạt của TypeScript cùng với các nguyên tắc kiến trúc từ Angular, giúp xây dựng mã nguồn sạch sẽ và tổ chức.

Đặc Điểm Kỹ Thuật
- Kiến Trúc Modular:
- NestJS thúc đẩy việc sử dụng kiến trúc module để tổ chức mã nguồn. Các module giúp tạo ra các thành phần độc lập, tái sử dụng và dễ bảo trì.
- Dependency Injection (DI):
- NestJS tích hợp Dependency Injection, giúp quản lý các đối tượng và phụ thuộc một cách dễ dàng. Điều này tạo ra mã nguồn linh hoạt và dễ kiểm thử.
- Decorators và Metadata:
- NestJS sử dụng decorators và metadata để đánh dấu và cấu hình các thành phần, giúp giảm bớt một số boilerplate code và tăng tính tự giải thích của mã nguồn.
- Middleware và Interceptors:
- NestJS hỗ trợ middleware và interceptors để xử lý các yêu cầu trước khi chúng đến đến các endpoint, giúp thực hiện các chức năng như xác thực, logging, và xử lý lỗi.
- TypeScript và JavaScript:
- NestJS có thể được viết bằng TypeScript hoặc JavaScript, giúp cho việc tích hợp dễ dàng với các dự án hiện tại.
- ORM Integration:
- Hỗ trợ tích hợp với nhiều ORM phổ biến như TypeORM, Sequelize, và Mongoose để tương tác với cơ sở dữ liệu.
- WebSocket và Microservices:
- NestJS hỗ trợ WebSocket và Microservices, giúp xây dựng ứng dụng thời gian thực và mở rộng dễ dàng.
- Testing:
- Cung cấp một bộ khung kiểm thử tích hợp và hỗ trợ kiểm thử đơn vị (unit testing) và kiểm thử tích hợp (integration testing).
- Documentation và Community:
- Có tài liệu chi tiết và một cộng đồng phong phú, giúp người dùng dễ dàng học và giải quyết vấn đề.
- Ecosystem:
- Hỗ trợ một số lượng lớn các thư viện và module bổ sung, giúp phát triển các tính năng mà không cần xây dựng lại từ đầu.
Từ những ưu điểm trên tôi tiến hành xây dựng API CURD để quản lý việc đổ xăng.
Đây là dữ liệu của tôi được tạo bằng Mysql
CREATE TABLE `refueling`  (
  `id` int NOT NULL AUTO_INCREMENT,
  `km` int NULL DEFAULT NULL,
  `refueling_day` date NULL DEFAULT NULL,
  `total_lit` decimal(10, 2) NULL DEFAULT NULL,
  `price_lit` decimal(10, 2) NULL DEFAULT NULL,
  `price_total` decimal(10, 2) NULL DEFAULT NULL,
  `notes` varchar(255) CHARACTER SET utf8mb4 COLLATE utf8mb4_general_ci NULL DEFAULT NULL,
  `deleted_at` timestamp NULL DEFAULT NULL,
  `created_by` int NULL DEFAULT NULL,
  `updated_by` int NULL DEFAULT NULL,
  `created_at` timestamp NULL DEFAULT NULL,
  `updated_at` timestamp NULL DEFAULT NULL,
  PRIMARY KEY (`id`) USING BTREE
) ENGINE = InnoDB AUTO_INCREMENT = 45 CHARACTER SET = utf8mb4 COLLATE = utf8mb4_general_ci ROW_FORMAT = Dynamic;
Để tạo chức năng CRUD (Create, Read, Update, Delete) cho bảng refueling trong MySQL sử dụng NestJS, bạn cần thực hiện các bước sau:
Để tạo chức năng CRUD (Create, Read, Update, Delete) cho bảng refueling trong MySQL sử dụng NestJS, bạn cần thực hiện các bước sau:
1. Cài đặt và Cấu hình
Cài đặt NestJS và MySQL Connector:
npm i @nestjs/typeorm typeorm mysql2Cấu hình TypeORM:
{
  "type": "mysql",
  "host": "localhost",
  "port": 3306,
  "username": "your_username",
  "password": "your_password",
  "database": "your_database",
  "entities": ["dist/**/*.entity{.ts,.js}"],
  "synchronize": true
}
2. Tạo Entity
Tạo file refueling.entity.ts:
import { Entity, PrimaryGeneratedColumn, Column } from 'typeorm';

@Entity()
export class Refueling {
  @PrimaryGeneratedColumn()
  id: number;

  @Column({ nullable: true })
  km: number;

  @Column({ type: 'date', nullable: true })
  refueling_day: Date;

  @Column({ type: 'decimal', precision: 10, scale: 2, nullable: true })
  total_lit: number;

  @Column({ type: 'decimal', precision: 10, scale: 2, nullable: true })
  price_lit: number;

  @Column({ type: 'decimal', precision: 10, scale: 2, nullable: true })
  price_total: number;

  @Column({ nullable: true })
  notes: string;

  @Column({ type: 'timestamp', nullable: true })
  deleted_at: Date;

  @Column({ nullable: true })
  created_by: number;

  @Column({ nullable: true })
  updated_by: number;

  @Column({ type: 'timestamp', nullable: true })
  created_at: Date;

  @Column({ type: 'timestamp', nullable: true })
  updated_at: Date;
}
3. Tạo CRUD Service
Trong refueling.service.ts, hãy thêm các phương thức cần thiết:
import { Injectable } from '@nestjs/common';
import { InjectRepository } from '@nestjs/typeorm';
import { Repository } from 'typeorm';
import { Refueling } from './refueling.entity';

@Injectable()
export class RefuelingService {
  constructor(
    @InjectRepository(Refueling)
    private refuelingRepository: Repository<Refueling>,
  ) {}

  findAll(): Promise<Refueling[]> {
    return this.refuelingRepository.find();
  }

  findOne(id: string): Promise<Refueling> {
    return this.refuelingRepository.findOne(id);
  }

  async create(refueling: Refueling): Promise<Refueling> {
    return this.refuelingRepository.save(refueling);
  }

  async update(id: string, refueling: Partial<Refueling>): Promise<void> {
    await this.refuelingRepository.update(id, refueling);
  }

  async delete(id: string): Promise<void> {
    await this.refuelingRepository.delete(id);
  }
}
4. Tạo CRUD Controller
Trong refueling.controller.ts, bạn cần xử lý các request và gọi service:
import { Controller, Get, Post, Put, Delete, Body, Param } from '@nestjs/common';
import { RefuelingService } from './refueling.service';
import { Refueling } from './refueling.entity';

@Controller('refueling')
export class RefuelingController {
  constructor(private readonly refuelingService: RefuelingService) {}

  @Get()
  findAll(): Promise<Refueling[]> {
    return this.refuelingService.findAll();
  }

  @Get(':id')
  findOne(@Param('id') id: string): Promise<Refueling> {
    return this.refuelingService.findOne(id);
  }

  @Post()
  create(@Body() refueling: Refueling): Promise<Refueling> {
    return this.refuelingService.create(refueling);
  }

  @Put(':id')
  update(@Param('id') id: string, @Body() refueling: Partial<Refueling>): Promise<void> {
    return this.refuelingService.update(id, refueling);
  }

  @Delete(':id')
  delete(@Param('id') id: string): Promise<void> {
    return this.refuelingService.delete(id);
  }
}
5. Đăng ký Module
Trong file refueling.module.ts, bạn sẽ khai báo các controllers và providers mà module này sử dụng.
import { Module } from '@nestjs/common';
import { TypeOrmModule } from '@nestjs/typeorm';
import { RefuelingController } from './refueling.controller';
import { RefuelingService } from './refueling.service';
import { Refueling } from './refueling.entity';

@Module({
  imports: [TypeOrmModule.forFeature([Refueling])],
  controllers: [RefuelingController],
  providers: [RefuelingService],
})
export class RefuelingModule {}
6. Import vào APPMODULE
Để sử dụng RefuelingModule, bạn cần import nó vào AppModule (file src/app.module.ts).
import { Module } from '@nestjs/common';
import { TypeOrmModule } from '@nestjs/typeorm';
import { RefuelingModule } from './refueling/refueling.module';

@Module({
  imports: [TypeOrmModule.forRoot(), RefuelingModule],
  controllers: [],
  providers: [],
})
export class AppModule {}
Trong AppModule, bạn import RefuelingModule để NestJS có thể nhận biết và tích hợp chức năng của nó vào ứng dụng.
OK. Vậy là chúng ta đã thực hiện xong các bước khai báo Controller, Service, Entity. Sau đó chúng ta thực hiện chạy thử bằng cách sử dụng command
npm run startBạn sẽ nhận được thông báo như sau nếu chạy thành công
[12:08:02 AM] Starting compilation in watch mode...

[12:08:04 AM] Found 0 errors. Watching for file changes.

[Nest] 15572  - 12/06/2023, 12:08:05 AM     LOG [NestFactory] Starting Nest application...
[Nest] 15572  - 12/06/2023, 12:08:05 AM     LOG [InstanceLoader] TypeOrmModule dependencies initialized +88ms
[Nest] 15572  - 12/06/2023, 12:08:05 AM     LOG [InstanceLoader] AppModule dependencies initialized +0ms
[Nest] 15572  - 12/06/2023, 12:08:05 AM     LOG [InstanceLoader] TypeOrmCoreModule dependencies initialized +41ms
[Nest] 15572  - 12/06/2023, 12:08:05 AM     LOG [InstanceLoader] TypeOrmModule dependencies initialized +1ms
[Nest] 15572  - 12/06/2023, 12:08:05 AM     LOG [InstanceLoader] RefuelingModule dependencies initialized +0ms
[Nest] 15572  - 12/06/2023, 12:08:05 AM     LOG [RoutesResolver] AppController {/}: +10ms
[Nest] 15572  - 12/06/2023, 12:08:05 AM     LOG [RouterExplorer] Mapped {/, GET} route +1ms
[Nest] 15572  - 12/06/2023, 12:08:05 AM     LOG [RoutesResolver] RefuelingController {/refueling}: +0ms
[Nest] 15572  - 12/06/2023, 12:08:05 AM     LOG [RouterExplorer] Mapped {/refueling, GET} route +1ms
[Nest] 15572  - 12/06/2023, 12:08:05 AM     LOG [RouterExplorer] Mapped {/refueling/:id, GET} route +0ms
[Nest] 15572  - 12/06/2023, 12:08:05 AM     LOG [RouterExplorer] Mapped {/refueling, POST} route +1ms
[Nest] 15572  - 12/06/2023, 12:08:05 AM     LOG [RouterExplorer] Mapped {/refueling/:id, PUT} route +0ms
[Nest] 15572  - 12/06/2023, 12:08:05 AM     LOG [RouterExplorer] Mapped {/refueling/:id, DELETE} route +0ms
[Nest] 15572  - 12/06/2023, 12:08:05 AM     LOG [NestApplication] Nest application successfully started +2ms
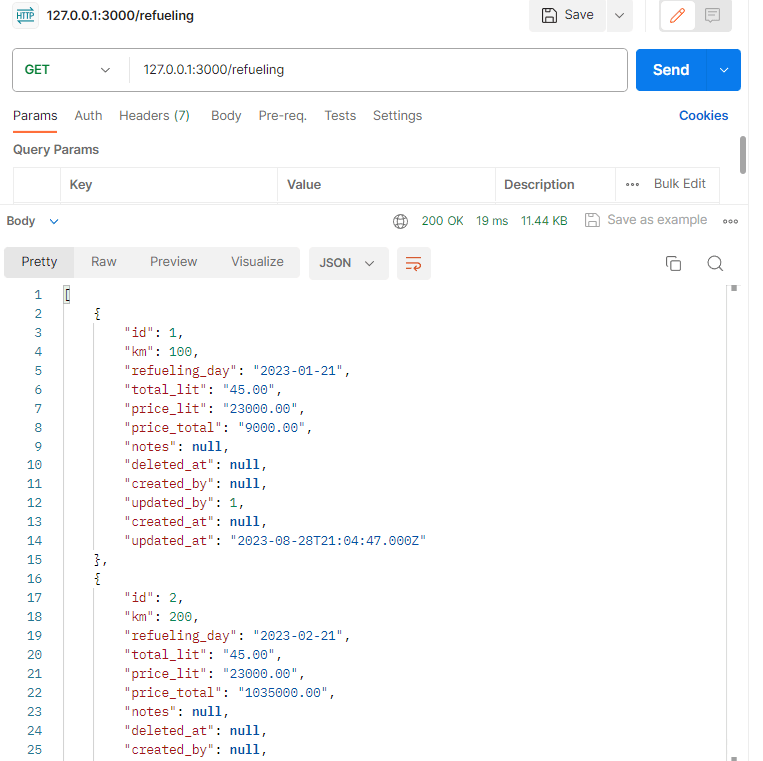
Tiếp theo chúng ta mở Postman chạy thử xem thế nào nhé.

Như bạn thấy chúng ta đã lấy được danh sách refueling
Hy vọng với bài giới thiệu ngắn gọn về NestJS và 1 ví dụ đơn giản bạn có thể hiểu được về cách thức hoạt động của NestJs.
Bạn có thể truy cập vào document của NestJs để đọc thêm: https://docs.nestjs.com
Tài liệu về typeorm bạn có thể tham khảo tại đây: https://orkhan.gitbook.io/typeorm


